UCS Central is the centralized management tool for managing UCS domain.
Prerequisites :
1. Make sure NTP server name and time zone matches exactly between the UCS central and UCS manager. Lot of time I get into trouble in registering the UCS manager with UCS central due to this .
you can set this on UCS manager ----> admin -----> Time Zone Management

On UCS central Administration----->General-----> Date/time

2. Ucs central IP address and Shared Secret password is required for this
Actual Steps :
Step 1:
Goto UCS Manager ----> Admin ----> UCS central ( if you not seeing this option under Admin tab then check the filter under Admin tab and make sure either UCS central is selected or ALL is selected)
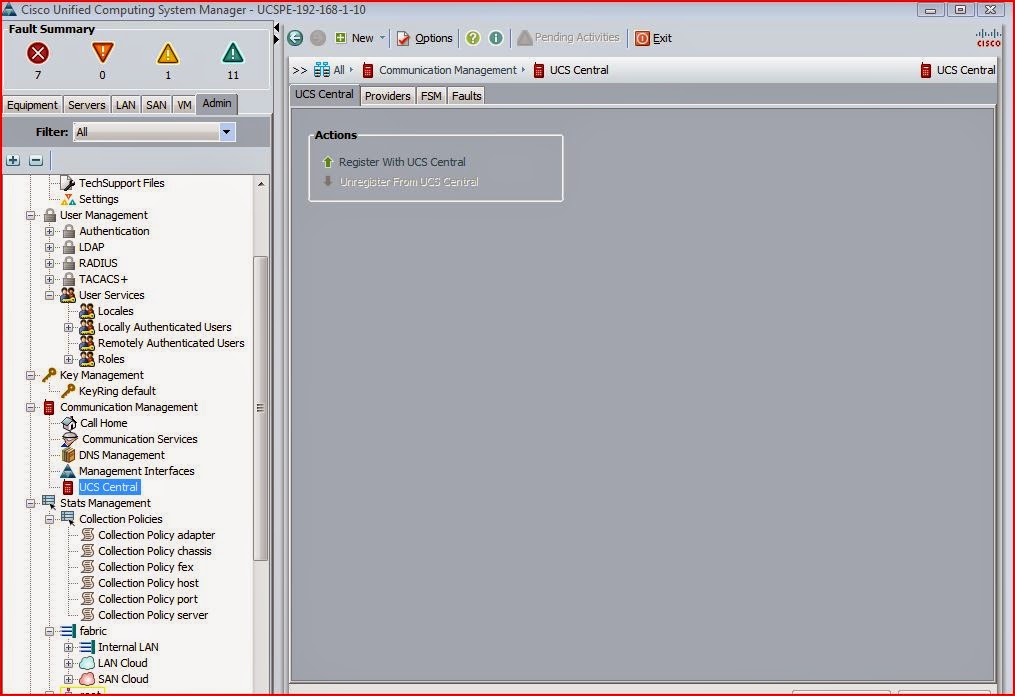
Step 2 :
click Register with UCS Central

Step 3:
update the UCS Central ip and Shared secret password
Step 4:
if you want to change some policy revolution control to global ( which means it will get the settings from UCS central ) you can select that as global or you can change this anytime after registration
Step 5:
click ok and accept

Step 6:
once it is properly registered wtth UCS central then the repair state is showing as done and Registration status will be showing as Registered . Check the FSM tab to see the progress

step 7:
On the UCS Central login navigate to Equipment ---> UCS domain ------> Ungrouped domains and UCS manager will be listing there if the registration is successful

Step 8:
Right click on the UCS manager under Ungrouped Domain and click change group assignment

Step 9:
Select the proper domain Group , either put that on root domain group or you can create a sub domain group. I would prefer to create a sub domain group and click yes for changing the group.


Step 10:
check the ucs manager is showing under the Domain group

Prerequisites :
1. Make sure NTP server name and time zone matches exactly between the UCS central and UCS manager. Lot of time I get into trouble in registering the UCS manager with UCS central due to this .
you can set this on UCS manager ----> admin -----> Time Zone Management
On UCS central Administration----->General-----> Date/time
2. Ucs central IP address and Shared Secret password is required for this
Actual Steps :
Step 1:
Goto UCS Manager ----> Admin ----> UCS central ( if you not seeing this option under Admin tab then check the filter under Admin tab and make sure either UCS central is selected or ALL is selected)
Step 2 :
click Register with UCS Central
Step 3:
update the UCS Central ip and Shared secret password
Step 4:
if you want to change some policy revolution control to global ( which means it will get the settings from UCS central ) you can select that as global or you can change this anytime after registration
Step 5:
click ok and accept
Step 6:
once it is properly registered wtth UCS central then the repair state is showing as done and Registration status will be showing as Registered . Check the FSM tab to see the progress
step 7:
On the UCS Central login navigate to Equipment ---> UCS domain ------> Ungrouped domains and UCS manager will be listing there if the registration is successful
Step 8:
Right click on the UCS manager under Ungrouped Domain and click change group assignment
Step 9:
Select the proper domain Group , either put that on root domain group or you can create a sub domain group. I would prefer to create a sub domain group and click yes for changing the group.
Step 10:
check the ucs manager is showing under the Domain group