Wednesday, November 12, 2014

UCS Firmware upgrade high level steps

Here is the high level steps for UCS firmware upgrade for most the environment. You may need to check additional componenets depend on the environment but the below one covers mostof the common thing s we need to check prior to the upgrade


1. Checking the compatibility matrix for the esxi server with the version of UCS firmware
        http://www.cisco.com/web/techdoc/ucs/interoperability/matrix/matrix.html
2. Downloading the firmware and required hardware (enic and fnic) drivers
3. Disabling the phone home alert
4. Backup the ucs configuration
5. Check the space on fabric interconnect and if required delete the older version of bin files
6. Uploading the firmware to UCS
7. Upload the enic and fnic vib to the common datastore on the esx cluster
8. Checking the maintenance policies and make sure it is in user acknowledgement.
9. Upgrade the infrastructure firmware using auto install option
10. Reboot the secondary fabric interconnect
11. Reboot the primary fabric interconnect
12. Once ucs manager / fabric interconnect updated to the new version then using server firmware update the blade server components
13. Put each blade in maintenance mode ( vmotion the vm to other hosts)  and reboot
14. Once the blade is up, install the enic and fnic drivers and restart the blade
15. Exit from maintenance mode
16. Repeat the same steps ( 12 to 14 ) for rest of the blades
17. Check for any error once all the update is completed (during the update you may see increased number of errors that will resolve once update is completed)
18. Enable the phone home alert back.


Thursday, October 2, 2014

Registering UCS manager with UCS Central

UCS Central is the centralized management tool for managing UCS domain.

Prerequisites : 

1. Make sure NTP server name and time zone matches exactly between the UCS central and UCS manager. Lot of time I  get into trouble in registering the UCS manager with UCS central due to this .

you can set this on UCS manager ----> admin -----> Time Zone Management 


 On UCS central Administration----->General-----> Date/time


2. Ucs central IP address and  Shared Secret password is required for this


Actual Steps :

Step 1:

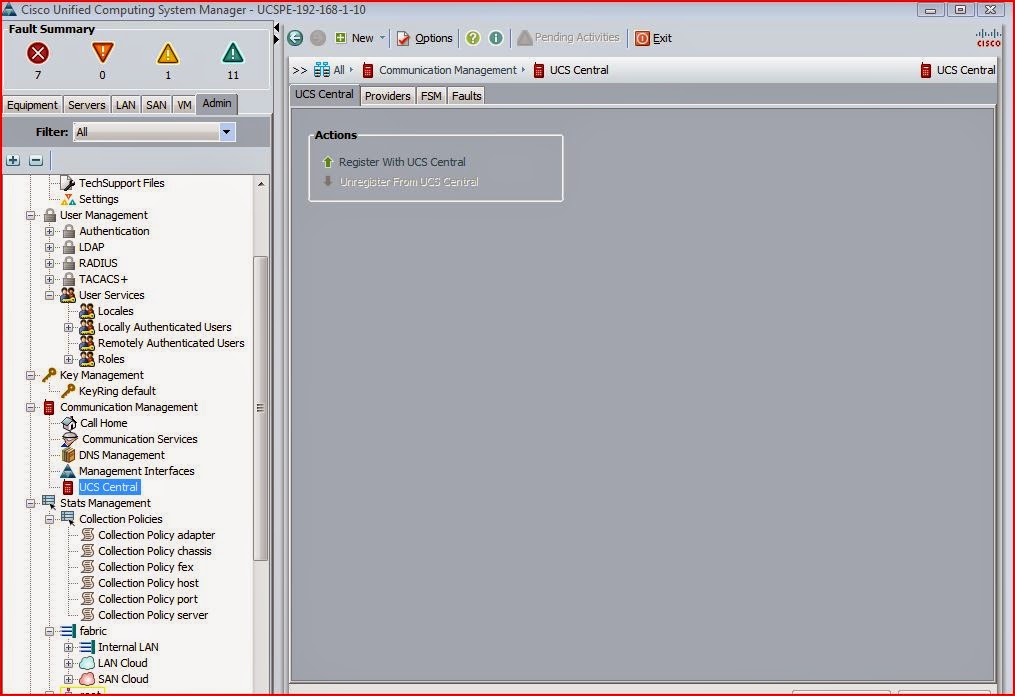
Goto UCS Manager ----> Admin ----> UCS central   ( if you not seeing this option under Admin tab then check the filter under Admin tab and make sure either UCS central is selected or ALL is selected)


Step 2 :

click Register with UCS Central


Step 3:

update the UCS Central ip and Shared secret password


Step 4:

if you want to change some policy revolution control  to global  ( which means it will get the settings from UCS central ) you can select that as global or you can change this anytime after registration


Step 5:

click ok and accept 


Step 6:

once it is properly registered wtth UCS central then the repair state is showing as done and  Registration status will be showing as Registered . Check the FSM tab to see the progress


step 7:

On the UCS Central login  navigate to Equipment ---> UCS domain ------> Ungrouped domains and  UCS manager will be listing there if the registration is successful


Step 8: 

Right click on the UCS manager under Ungrouped Domain and click change group assignment


Step 9: 

 Select the proper domain Group , either put that on root domain group or you can create a sub domain group. I would prefer to create a sub domain group  and click yes for changing the group.


Step 10:

check the ucs manager is showing under the Domain group


How to expand or resize the netapp lun which is having snapmirror

Below are the simple steps to expand the or resize the snapmirror lun.

Step 1:  Note down the source volume name and destination volume name

Step 2: ssh into both source and destination netapp controller

Step 3: On the destination or target netapp ssh session  run the below command

            a. priv set advanced
            b. snapmirror break "destination volume name"
            c. vol options "destination volume name" fs_size_fixed off
            d. vol size "destination volume name"  1000g  ( here I am resizing the lun from 500 to 1000 GB)
                 Note: please change the size of the lun according to the requirement
           e.  vol options " destination volume name" fs_size_fixed on

step 4. On the source netapp ssh session run the below command

            a. priv set advanced
            b. vol options "source volume name" fs_size_fixed off
            c. vol size "source volume name"  1000g  ( here I am resizing the lun from 500 to 1000 GB)
                 Note: please change the size of the lun according to the requirement
           d. vol options " source volume name" fs_size_fixed on
       
step 5. On the destination netapp ssh session run the below command
     
           a.snapmirror resync -S sourcefiler:sourcevolumename targetfiler:targetvolumenane


Friday, June 20, 2014

Vcenter Inventory Service Failed to start in Vcenter appliance or accessing vsphere webclient shows the error " Client is not authenticated to Vmware inventory service"

Issue : Vcenter appliance inventory service failed to start or accessing the vsphere webclient shows that the client is not able to authenticated to the VMware inventory services.

Where to check the logs for this :  

1.Connect the vcenter appliance with putty (ssh session) or through the console

2.Navigate to the path /var/log/vmware/vpx/inventoryservice  and check the ds log file by running the below command.
                       cd  /var/log/vmware/vpx/inventoryservice
                      cat ds.log | more

3. check to see if the database is showing as corrupt , if it is then follow the solution. This steps is for version esxi 5.5 , you can refer this vmware  kb article 2037952 for rest of the version

Solution :

1.Connect the vcenter appliance with putty (ssh session) or through the console

2.Stop the inventory service by running the command
                   Service vmware-inventoryservice stop

3.remove the data
                   rm -rf /storage/db/inventoryservice/data

4. Navigate to the path /usr/lib/vmware-vpx/inventoryservice/scripts/
                   cd /usr/lib/vmware-vpx/inventoryservice/scripts

5. run the ds-invoke.sh with the default password
                     ./ds-invoke.sh -Dvim.logdir=/var/log/vmware/vpx/inventoryservice com.vmware.vim.dataservices.CreateDb /storage/db/inventoryservice/data changeme default changeme
6.start the inventory service
                     Service vmware-inventoryservice start

7. register the vcenter appliance
                      vcenterhost=vcneterservername.yourdomaname.com

8.navigate to the directory /usr/lib/vmware-vpx/inventoryservice-registration
                      cd /usr/lib/vmware-vpx/inventoryservice-registration

9. run the vcregtool.sh
                   ./vcregtool.sh -Dvim.logdir=/var/log/vmware/vpx/inventoryservice-registration com.vmware.vim.dataservices.vcregtool.RegisterVC -action register -lookupserviceurl https://$vcenterhost:7444/lookupservice/sdk -isurl https://$vcenterhost:10443 -vcurl https://$vcenterhost/sdk/vimService -vccert /etc/vmware-vpx/ssl/rui.crt -vcprivkey /etc/vmware-vpx/ssl/rui.key -vcinstancecfg /etc/vmware-vpx/instance.cfg -vcendpointsdir /usr/lib/vmware-vpx/endpoints -vcextensionsdir /usr/lib/vmware-vpx/extensions

10. restart the vmware-vpxd service
                   service vmware-vpxd restart


ESXI host 5.5 takes long time to boot and stays at VMW_Vaaip_Cx loaded successfully

Issue :  ESXI 5.5 boot take long time and stays at VMW_VAAIP_CX  loaded successfully , this may take an hour or so to bring the ESXI 5.5 completely.

Cause : This will be happening on the environment which have Microsoft cluster vm and RDM disk is presented to that Microsoft cluster vm . Especially the RDM lun is not showing as Perennially reserved =true. You can check whether the lun is perennially reserved or not by running the below command

esxcli storage core device list 

Solution: Will explain how to fix this on ESXi 5.5 version , for rest of the version please check the vmware kb article number 1016106.

1.We need to know the LUN identifier ( naa.id ) for all the rdm disk and  this identifier varies for different storage vendor.
2. There are multiple ways to get the identifier , simple way is to click edit settings on the vm and click the rdm lun and on the right hand side click manage path , note down the lun number and identifier.
3. We can also get the identifier from Configuration---storage adapter and click one of the hba .
4.ssh into the esxi server
5.Run the command for each RDM lun

esxcli storage core device setconfig -d naa.id --perennially-reserved=true

Do this for all the esxi host which is part of the same cluster.


Wednesday, May 14, 2014

How to add the spare disk on netapp filer

Here is the steps to add the disk as spare disk on netapp

1. SSH into the controller
2. turn off the auto assign option by running the command options disk.auto_assign off
3. Put the new hard drive on one of the empty slots on disk shelf
4. run the command disk show -n  , this will show the newly added disk as not owned by any controller
5. run this command disk assign oa.00.8  to assign the controller where 0a is the controller identification ,00 is the disk shelf number and 8 is the disk number
6. Turn on the auto assign option by running the command options disk.auto_assign on
7. run disk show , you will be seeing the new disk as spare
8. for some reason you want to remove that hard drive you can unassign the disk by running the command disk assign 0a.00.8 -s unowned -f


windows File server move using robocopy

Often I used to get request to move the file share server to a different server , There are several option available to finish this job, the easiest one would be the robocopy one.

Robocopy will take care of ntfs permission on the folder but will not copy the share permission. If robocopy is used for the file share move then we need to export the share permission from exisitng windows server then import that to the new fileshare server.

Here is the high level steps

1. copy the below command in a text file and save it as filename.bat

@ECHO OFF
SETLOCAL

SET _source=D:\
SET _dest=E:\
SET _what=/COPYALL /SEC /MIR /Z
 :: /COPYALL :: COPY ALL file info
 :: /B :: copy files in Backup mode.
 :: /SEC :: copy files with SECurity
 :: /MIR :: MIRror a directory tree
SET _options=/R:0 /W:0 /LOG:Logfile.txt /NFL /NDL
 :: /R:n :: number of Retries
 :: /W:n :: Wait time between retries
 :: /LOG :: Output log file
 :: /NFL :: No file logging
 :: /NDL :: No dir logging

ROBOCOPY %_source% %_dest% %_what% %_options%

Note : please replace d:\ with the source path and also I:\ with the destination path. Also keep in mind that this will excatly mirror the source to destination , if destination has any extra files or folders that will be deleted.

2.download robocopy and save that exe and filename.bat on same location

3. run the filename.bat on a administrative command prompt.

4. The log file will be generated on the same location which includes start time ,end time , how much size is copied or ignored or failed . If any files copy is failed it will be reported on the log file

5.From the HKEY_LOCAL_MACHINES\SYSTEM\CurrentControlSet\Services\LanmanServer\Shares

6. export the above key from source server and import on the destination server

Note: this will work if you are moving entire file share server .if you are moving only portion of file share server then after import delete the unwanted share key.